
How to find your ideal saddle position

Figuring out your ideal saddle position is one of the most important things you can do to aid comfort when riding. A simple change to your riding position can also help to prevent knee pain and saddle sores, whilst also allowing for a greater power output through the pedals.
Trying to figure out the correct position your saddle should be in for mountain biking can sometimes prove to be difficult.
Should your feet touch the ground when seated?
Should your knees be at a certain angle?
What about the actual saddle, how far forward should that be?
Should your saddle be level, or point up or down?
What if you have a dropper post?
Basically if your saddle is too low it will force you to put more pressure through your knees when pedalling. Where as if your saddle is too high it will result in your legs being locked out at the lowest point of the pedal stroke. Both of these poor riding positions can lead to joint and muscular injuries. As an addition, when the saddle is too high your hips will rock from side to side, and it’s this rocking movement that will eventually cause chafing and other superficial wounds on your backside i.e. saddle sores.
All avoidable problems.
There are generally 4 methods that you can use to determine your correct saddle height. One in particular is far easier to execute than the others, but they are all equally as effective at finding the best starting point before you make any tweaks.
The 109% Method
This method concludes that the ideal saddle position is a distance of 109% of the length of your inseam from the top of the saddle, to the lower pedal axle. Once you have done the maths use your calculation to measure the distance from the top of your saddle to the lower pedal axle, just make sure that the crank aligns with the seat tube and seat post when measuring.
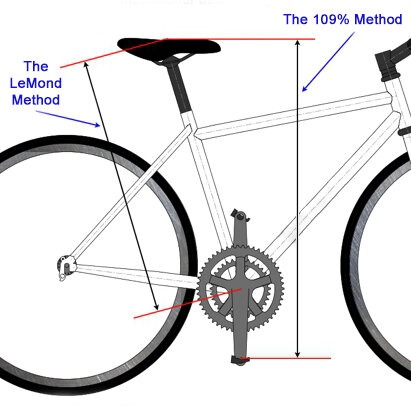
The subtle difference between the 109% Method and the LeMond Method. Image courtesy of apexbikes.com
The LeMond Method
This is named after the legendary American cyclist Greg LeMond who actually invented this method. As with the 109% method it is based on a measurement of your inseam. This time though you want to calculate 88.3% of your inseam measurement, and then use this to calculate the height from the top of your saddle to the bottom bracket. The problem with this method is that it doesn’t take into account the length of your cranks, but it will give you a good position to start from.
The Holmes Method
This method is the most technical and requires the use of a goniometer. A goniometer is a tool that measures the range of motion in a joint.

Image courtesy of blog.bikefit.com
With this method you use the goniometer to measure the angle of your knee joint at the bottom of the pedal stroke. The ideal angle should be somewhere between 25º and 35º. Although it is generally accepted that this method can provide better results, it can be too technical and it does require you to spend money on a goniometer, as well as enlist the help of someone else to ensure the measurements are accurate.
I’m all for simplicity, and by far the easiest and quickest way to measure your saddle height is with the final method.
The ‘heel method’ is the most basic, and arguably the easiest method used to determine your ideal saddle height.
The Heel Method
This method be the most basic, but it is arguably the easiest and most used to determine your ideal saddle height.

Image courtesy of blog.bikefit.com
To use this method make sure your saddle is flat and parallel to the ground. Once sat on your bike, use a wall or object to support yourself. Place one foot on a pedal and make sure your heel is on the pedal’s axle. Position this pedal at the bottom of the stroke (the lowest point), and adjust your saddle until your leg is totally straight. You will notice that when you then place your foot on the pedal to cycle your leg will be slightly bent.
Once you have adjusted the height it is also worth looking at the angle and the fore/aft position of your saddle.
It’s all in the details
Generally speaking when it comes to the angle of the saddle you will usually find the comfiest position is when the saddle is level, but it is somewhat down to personal preference. If you ride a full suspension bike I would recommend tipping the nose of the saddle down slightly due to the rear suspension sagging when you’re seated.
The fore/aft position of your saddle simply refers to how far forward or backward you have the saddle positioned. To set the fore/aft position start with your saddle centrally positioned on the rails. If you want your bike to feel more eager on climbs I would position the saddle slightly further forward, and if you want to create a roomier cockpit when riding on flat ground moving the saddle back slightly can help. However, it is worth noting the position of your knees when making changes to the fore/aft position. When you are seated with the pedals at 9 o’clock and 3 o’clock, ideally you are aiming to make sure your knee is positioned over the axle for the forward pedal.
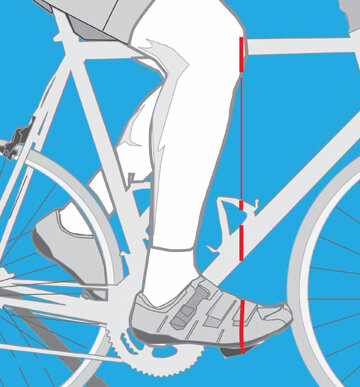
Image courtesy of blog.bikefit.com
Whatever changes you make to the height and positioning of your saddle. It’s important that you pay attention to how you feel on the bike, so once you’ve made changes to your set-up go for a ride. Take an allen key with you and if you need to make a few tweaks to your saddle positioning as you go along you can do. Just remember to only make small incremental changes.
It really isn’t that difficult to find your own ideal position in the saddle. It can just take a bit of time.